Our Deck Makeover Reveal

Today, I’m revealing our (finally) finished deck makeover! When we moved in, our deck boards were old and rotted, the pavers were overgrown with weeds, and our yard had been about halfway taken over with vines and overgrown plants. This deck was one of the items on our 2020 home projects list, and it felt great to cross it off! Having lots of livable outdoor space is a high priority for us, because we know we’ll be spending lots of time in the backyard with Jamie this summer!

Image of finished deck makeover with table and chairs.

The backyard was one of the things we loved most about our house when we first saw it; we knew it had tons of potential for a great outdoor living space. Although small, the yard is quite flat and pretty square (a real rarity in western PA!), and we loved the mature trees. A few other selling features were the fence, the privacy (pretty good for a neighborhood), and the perfect combo of lots of warming sun in the winter and nice shade in the summer (once the trees have leaves).

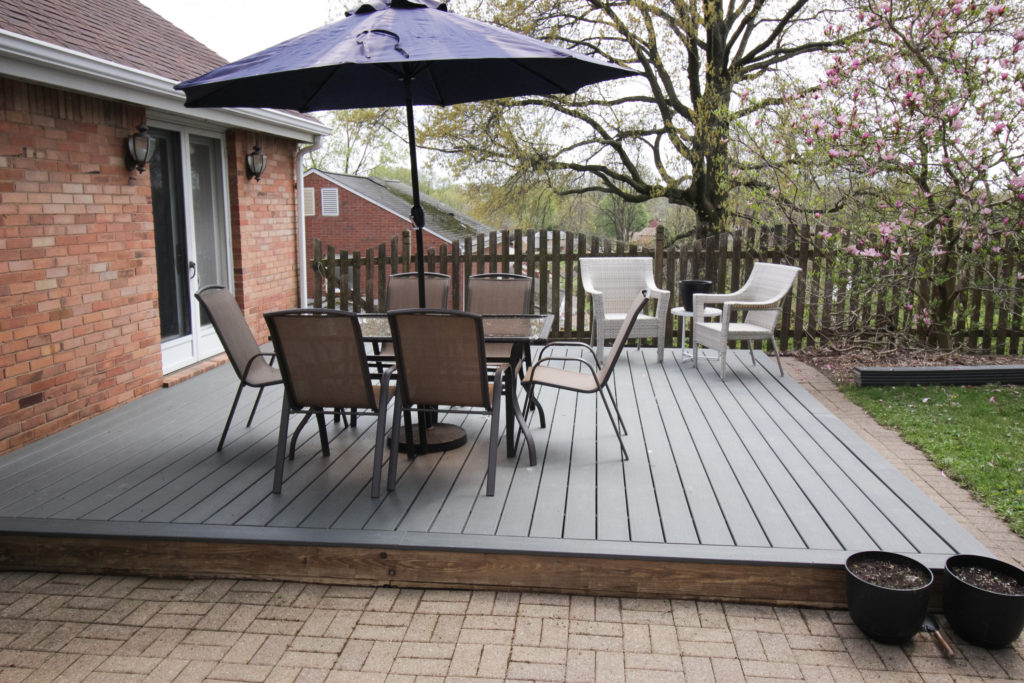
After ripping off the old deck boards pretty early on, we left the joists exposed for a year-ish. We bought the new Trex boards last winter but between an error in our board delivery resulting in a shipping delay, the winter, and a baby, we didn’t get around to finishing it until this spring. We are SO happy that we finished it just a few weeks before our state’s COVID-related stay-at-home order went into effect. We’ve been getting a TON of use out of it already!

Note: this post may contain affiliate links (i.e., if you click my link and make a purchase, I’ll make a small commission at no additional cost to you). Read my full disclosure policy here.

Read More »
DIY Cupcake Bath Bombs with Young Living Essential Oils

DIY Bath Bombs for Galentine’s Day

I’m super excited to share this DIY with you all today. These bath bombs smell awesome, and it’s so fun to watch them fizz up in the bath! I made these in muffin tins with cupcake liners, so  they look super cute, and you don’t need to buy a bath bomb mold (unitaskers = not good). I made these for Galentine’s day this year, but they would also make a great gift for birthdays and Mother’s Day (or a nice gift for yourself). I also love that these DIY bath bombs are so easy and inexpensive to make – I can’t believe I didn’t make them sooner!

DIY Bath Bombs Gift

DIY Bath Bombs

(makes 12 medium “cupcakes” or 8 large ones)

  • 8 oz baking soda
  • 4 oz corn starch
  • 4 oz citric acid* (you can find this easiest on amazon)
  • 4 oz epsom salt
  • 2-3 tsp water
  • 10-20 drops essential oils
  • 2 tsp oil (I like jojoba oil* best, but coconut, olive, or sweet almond oil would also work!)

DIY Bath Bombs Essential Oils

Combine the dry ingredients in a large bowl. Stir to remove any lumps. (Be careful because it can get pretty powdery and you don’t want to inhale anything!)

In a small jar, stir together the wet ingredients (water and oil). If you’re only making one scent, add the essential oils now, but if you want to make multiple scents, you can add them later!

Slowly add the wet ingredients to the dry ingredients, stirring as you go. If the mixture starts getting really fizzy, add the liquids more slowly and stir more quickly. To check if you have enough liquid added, squeeze a little bit together in your hands (it should pack easily and stick together). Add a bit more water or oil if the mix doesn’t pack well.

If you want to make multiple scents, divide the mix into separate bowls and add your oils to each one! Some of my favorite oils to add are lavender + frankincense, lemon + tangerine, and stress away. (I only use Young Living essential oils because of their high quality and Seed to Seal guarantee. You can read more here.)

Pack the mix into a standard size muffin tin with cupcake liners. Make sure to really pack it in there tightly! If you have a second muffin tin, you can also press it into the first one (like you’re stacking it up) to pack the mix in even more.

Let your bath bombs dry for around a day before (carefully!) removing them from the muffin tin. Store in a dry place until you’re ready to use them.

DIY Bath Bombs Packaging

I wrapped these up in some fun tissue paper, packaged a few in each bag, and gave them to all my favorite gals!

I’m including a printable recipe and printable labels, to make it even easier for you all to put together this fun gift! You can also include an instruction sheet with each gift so all your friends can make these cute DIY bath bombs too (it’s the gift that keeps on giving). Just click on the links below to download!

VIEW AND PRINT INSTRUCTIONS

VIEW AND PRINT LABELS

This post contains affiliate links (denoted with an *). If you choose to make a purchase through the link, I will make a small commission at no extra cost to you. Thanks for supporting me and this blog!